Pages

Thursday, June 30, 2016

Blooming Treats / Party Winners

Here's how I served one of our treats at my Open House / Catalog Party on Sunday.  They were a big hit.  
As you can see, I made a bunch of them. 
For my color story, I paired Watermelon Wonder with Flirty Flamingo.  The green base is Cucumber Crush.  I love these little guys!
I had thought I'd be announcing winners on my blog on Monday, but I ran into some technical problems.  
So... drum roll, please...
Wait ..... Stop ..... 
I couldn't make a final decision on my favorite new In Color.  
I had a 3-way tie with my favorites --- 
Flirty Flamingo, Dapper Denim, and Peekaboo Peach.
So... all those who chose one of those 3 are winners!
The winners are:
Mary W.
Elaine B.
Linda B.
Connie J.
Marcella C.
Jessica B.
Sy M.

I have NEVER had this happen to me, but I just love all 3 of those colors.

As for my favorite new stamp set ... NO ONE guessed what it was.  I even gave you two big, fat clues.  
1.  I said I hadn't even gotten to use it yet.
2.  I laid out the stamp set AND the coordinating framelits on my mission library table, right in the middle of my displays.  

I tried to help you.  Anyway, we had a lot of winners for colors and you can look forward to seeing what I make with my favorite new stamp set.  By the way... it's Best Birds
I also had a drawing for 3 door prizes.  Those winners are:
Elaine B.
Connie J.
Marsha W.

Congrats to all the winners.  I will put your prizes in with your orders.

The orders are all placed and will be on their way soon.  I will let you know when your orders arrive.  Remember, if you earned tokens, they will be in with your order.

- Thanks for stopping by my corner of the blogging world. 
- Click on the tab at the top to see my class schedules. 
- Look on the left for sneak peeks and registration policies. 
- Please sign up to follow my blog and/or leave a comment. 
- Come  back often for more creative inspiration. 

Monday, June 27, 2016

I See Music

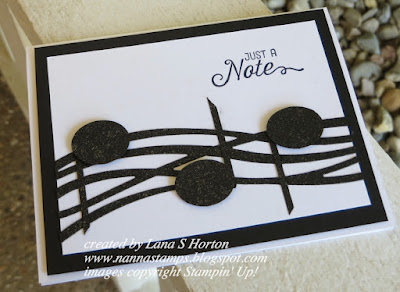
When I first looked at these five artistic, curvy lines, I immediately saw music ... 5 lines just waiting for music notes to dance upon them.  Here's what I created.  
The way the curvy lines swirl across the card, it just has to be happy music written there.   
I spritzed a shimmery mist over the entire top layer of the card, for some gorgeous sparkle.    
So now, do you see music?   I love this card!    
- Thanks for stopping by my corner of the blogging world. 
- Click on the tab at the top to see my class schedules. 
- Look on the left for sneak peeks and registration policies. 
- Please sign up to follow my blog and/or leave a comment. 
- Come  back often for more creative inspiration. 

Saturday, June 25, 2016

Affectionately Yours ... 4 Ways

Here's a fun way to come up with 4 really pretty cards.  Use your grid paper to figure out the sizes you'd like for each section of your card.  Cut 4 different designs of DSP and divide them up.  Rearrange them and you end up with 4 coordinated cards.  These would be fun to use as a boxed gift set.
When you read my description, it probably seems confusing but, once you see the cards, I think it's easy to get the idea.
Once I had my 4 pieces attached to my Night of Navy layer, I decided to emboss this entire layer.  I love the look!  It reminds me of a seersucker fabric.
Isn't this DSP just gorgeous?  I fell in love with it right away.
I used our Thick Whisper White CS for a nice, sturdy card base.
Adding the die cut flowers, just made the perfect finishing touch for this card set.
Have a fabulous weekend.  If you live in the area, I hope you'll stop by for my Open House/Catalog Party (June 26 / 2:00-5:00) and you can see these cards in person.

- Thanks for stopping by my corner of the blogging world. 
- Click on the tab at the top to see my class schedules. 
- Look on the left for sneak peeks and registration policies. 
- Please sign up to follow my blog and/or leave a comment. 
- Come  back often for more creative inspiration. 

Friday, June 24, 2016

Three Days of Peach, Day Three

For our last day of peachy goodness, I have some peachy friends for you.   
I just love these little hedgehogs.  I've paired my Peekaboo Peach with gold foil.  They compliment each other very nicely.  
The hedgehogs are embossed in gold.  
- Thanks for stopping by my corner of the blogging world. 
- Click on the tab at the top to see my class schedules. 
- Look on the left for sneak peeks and registration policies. 
- Please sign up to follow my blog and/or leave a comment. 
- Come  back often for more creative inspiration. 

Thursday, June 23, 2016

Three Days of Peach, Day Two

Here we are for another 'peachy' day together.  Today's card is TOTALLY peach!   
I've added sponging to highlight the different layers. 
I also sponged the embossed design, to highlight how pretty it is.  
You can't get peachier than this!  I still have one more day of peach, so be sure to join me.

- Thanks for stopping by my corner of the blogging world. 
- Click on the tab at the top to see my class schedules. 
- Look on the left for sneak peeks and registration policies. 
- Please sign up to follow my blog and/or leave a comment. 
- Come  back often for more creative inspiration. 

Wednesday, June 22, 2016

Three Days of Peach, Day One

Here we go again, with a little series of one of our new In Colors ... this time, Peekaboo Peach.  Today's card has a nice little sparkle to it, too. 
I have embossing inside and out and on the coordinating envelope, as well as some sponging.  
Sponging over the raised embossing really brings out the beautiful pattern. 
I think that Flirty Flamingo and Peekaboo Peach make an interesting color story.
Be sure to come back to check out my next two days of peach! 

- Thanks for stopping by my corner of the blogging world. 
- Click on the tab at the top to see my class schedules. 
- Look on the left for sneak peeks and registration policies. 
- Please sign up to follow my blog and/or leave a comment. 
- Come  back often for more creative inspiration. 

Tuesday, June 21, 2016

My Green Thumb in Action

No one has ever told me:  "What a green thumb you have!"  There's a reason for that.  I'm good with jade plants, marigolds, and hibiscus... and that's about it.  I have a project to share with you that shows off how I can STILL have a green thumb and enjoy it.   This is sitting on my table in my studio.
Aren't these just stinkin' cute?  This gives you a sneak peek at the new colors in my studio --- blues and greens.  I still have some black and white in the background.  It all works because the black and whites act as just a neutral background, just as I intended.  I'm loving my blues and greens together.
This trug (I think that's what you call it.) was green and I painted it to match my studio.  I actually left the green on the inside.  I just kind of like it that way.  I love how this turned out.  Give me a little paint and the next thing you know, I've reinvented an entire living space:)
Well, I'm off to babysit and perhaps work in a bit more creative time before the day is over.  What will you create today?
- Thanks for stopping by my corner of the blogging world. 
- Click on the tab at the top to see my class schedules. 
- Look on the left for sneak peeks and registration policies. 
- Please sign up to follow my blog and/or leave a comment. 
- Come  back often for more creative inspiration. 
Monday, June 20, 2016

Let There Be Baker's Twine

I can't wait for all my Open House Party guests to see my newly 'updated' look in my studio.  I've painted all my storage units (for inks and punches, etc.) and added some great fun with some blues and greens.  I love it!  One of the fun, new additions is a holder for my Baker's Twine. 

This holder was originally designed to hold K-cups.  I ordered it to hold my Washi Tape, but somehow ended up thinking it was cuter with my Baker's Twine. 
Isn't this adorable?!!!  Everything in my studio has to meet several of my criteria or it just plain doesn't get to play.  It must be:
1.  Cute
2.  Functional
3.  Handy
4.  Fun
If you're looking for a fun way to spruce up your crafting space, think outside the box.  Look for unique ways to store and display your stash.  It's fun and makes your creative space just that much more inspiring ... to get your creative juices flowing.
- Thanks for stopping by my corner of the blogging world. 
- Click on the tab at the top to see my class schedules. 
- Look on the left for sneak peeks and registration policies. 
- Please sign up to follow my blog and/or leave a comment. 
- Come  back often for more creative inspiration. 

Saturday, June 18, 2016

Thank you, Stampin' Up! ... and The Cutest Little Boxes Ever!!!

Thank you Stampin' Up! for all the great new video tutorials.  They are very helpful and super inspiring.  Are you aware of all the great resources you can find to help you with your stamping... besides my blog, of course:)

Here's a little project I made using a You Tube video to help me.  This is the cutest little popcorn box die ever!
I made one in each of our new In Colors.
I used our In Colors DSP Stacks for the strips to decorate the sides of each box.
Aren't these cute? 
I just added 'filler' to each box and no treats, so this is totally zero calories:)
Tip:
Want to know where to get a bargain on gift bag filler?  Go to Staples and choose a big bag of their 'packing' material for mailing.  It's only in this neutral color, but it goes with most anything and you get a big bag of it.

For more ideas and inspiration:
Click here to find lots of inspiring ideas.

Click here to find Stampin' Up! videos on
- Thanks for stopping by my corner of the blogging world. 
- Click on the tab at the top to see my class schedules. 
- Look on the left for sneak peeks and registration policies. 
- Please sign up to follow my blog and/or leave a comment. 
- Come  back often for more creative inspiration. 

Friday, June 17, 2016

Flirty Flamingo Week, Day Five

Let's wrap up our little Flirty Flamingo week with a beautiful color story ... Flirty Flamingo and Watermelon Wonder.  These two color go together like PB and J.  This card is probably my favorite from the entire week. 
The leaves and stems are Cucumber Crush and the flower on the right is Peekaboo Peach.  This card was inspired by the one in our new catalog on page 13, which features this Birthday Blossoms stamp set.
It's about impossible to see it in the photo, but I added a bit of Wink of Stella to the centers of the flowers.  
Be sure to come back for my next post.  I have 5 of the cutest little projects you've ever seen.  Well... maybe... but they're super cute.  See you there!

- Thanks for stopping by my little corner of the blogging world. 
- Click on the tab at the top of the page to see my class schedules and registration policies or look on the left for sneak peeks. 
- Come back soon and come back often for more creative inspiration. 

Thursday, June 16, 2016

Flirty Flamingo Week, Day Four

Today is a 'Thanks Kindly' day.  I love this stamp because it is so elegant.  Let's take a minute to think of some of the many things for which we are thankful... today and every day. 
I've added a layer of gold behind the top layer of the card, to coordinate with the heat embossed lettering in gold. 
I played around with some embossing on the inside and outside of the card and on the envelope.
Lightly sponging over the embossing really brings out the beautiful design.
I really like how this card turned out.  I think it's one of my favorites ... so far:)
Be sure to come back for my final Flirty Flamingo day.
 
- Thanks for stopping by my little corner of the blogging world. 
- Click on the tab at the top of the page to see my class schedules and registration policies or look on the left for sneak peeks. 
- Come back soon and come back often for more creative inspiration. 
Related Posts Plugin for WordPress, Blogger...