Pages

Monday, July 17, 2017

A 'Crafting Forever' Cute Little Sign for my Studio

I had this cute little sign back in my storage room for a while and had used it with products from our previous Annual Catalog.  I painted it to go with my updated decor in my studio.  I thought it could use a display update since the previous products I had on display in it had retired.  Our Crafting Forever stamp set was the perfect choice to use for this project.  This involved a lot of fussy cutting, but I think it was worth it.  Enjoy! 
My little sign has a pot of paint brushes, a cute little 3-D hanging sign, a colorful pen and 3 old fashioned clothespins (love!) wrapped with Baker's Twine.  The vintage clothespins and pot of paint brushes are totally me and the old fashioned pen reminds me of my daddy.  He loved this style pen and I used to spend many hours watching (and later helping) him fill the pens from various jars of ink.  He had blue, black, red and even green inks.  He also had a variety of rubber stamps --- the old kind with handles.  Hmmmmm ... that's a lot of 'genes' I inherited:)
I watercolored the images, using inks and my Aqua Painter.  The background paper (gorgeous Lemon Lime Twist!!!) is from our Eastern Elegance DSP (from our Eastern Palace Suite).  It's so much fun to create something like this that you can enjoy in your work space.  I hope you'll try creating something fun to enjoy in your space.  It puts a smile on your face and gets your creative juices flowing.
August Classes:
August 14 -- Scraps and Prayers
     5:30-7:30 / $15.00 -- a fabulous book box with cards project

THERE WILL BE NO SATURDAY STAMPERS CLASS IN AUGUST, DUE TO MY SURGERY.  CHECK BACK FOR SEPTEMBER DATES AND CLASSES. 
  

- Thanks for stopping by my corner of the blogging world.
- Come back often for more creative inspiration. 

Friday, July 14, 2017

A Tradition at My Classes and a Review Of All 6 Cards for Saturday Stampers

At one of my classes, some time ago, my husband came down to my studio to say hello to the group and see what we'd made.  He started asking each person which one they had made was their favorite.  I could tell they really liked sharing this and so I've made it a tradition now.  At the end of each class (when we make a series of cards) I have everyone tell me which one was their favorite.  It's fun to hear their choices and their explanations of why they chose the one they did.  I wonder which card or cards will be chosen tomorrow.  I can't wait to see!
Here again, are all 6 of the cards we'll be making at my Saturday Stampers class on July 15.  If you purchased a kit, use these photos or my previous posts for each individual card to help you create your own.  I hope these inspire you to get creating.  I honestly don't know which one is my favorite.  Do you have a favorite?


Here's a link to a good tutorial for creating the Front Step card.
http://www.janbcards.com/search?q=Front+Step+Card
Here's a link to a good tutorial for creating a Tri-Shutter card.
http://www.janbcards.com/2017/06/daisy-tri-shutter-card.html
July Classes:
July 15 -- Saturday Stampers     1:00-4:00 / $20.00 -- fun techniques to create 6 cards.  REGISTRATION CLOSED.

August Classes:
August 14 -- Scraps and Prayers
     5:30-7:30 / $15.00 -- book box with cards project. 

THERE WILL BE NO SATURDAY STAMPERS CLASS IN AUGUST.  CHECK BACK FOR SEPTEMBER DATES AND CLASSES. 
 
- Thanks for stopping by my corner of the blogging world.
- Come back often for more creative inspiration. 

Thursday, July 13, 2017

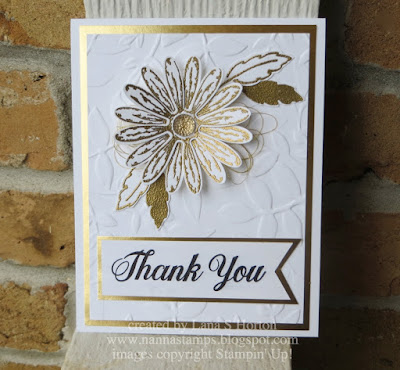
Elegant Daisy Card

Here's yet another card for my Saturday Stampers class.  We usually make 5-6 cards, depending on the time involved in making them.  We'll be making 6 this time and I think they're all really pretty ... and ... each one has something unique about it.

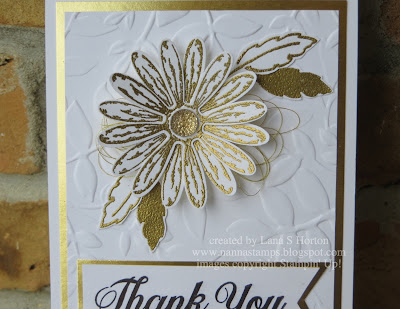
I call this card my elegant daisy card.  I started out knowing that I wanted to design an elegant gold and white card and that it would probably be a wedding card.  It ended up being an elegant thank you card.  Wouldn't this be a great card to send out thank you's for wedding gifts or other special occasions?
This card has gold embossing and a top layer that is embossed with one of our new 3-D Dynamic Textured Impressions Embossing Folders.  Let's hear you say that fast 3 times:)


July Classes:
July 15 -- Saturday Stampers     1:00-4:00 / $20.00 -- fun techniques to create 6 cards.  Just 2 remaining openings.
REGISTRATION CLOSES SOON!

BE SURE TO CHECK OUT JULY SPECIALS BY CLICKING ON THE IMAGES ON THE LEFT.  

August Classes:
August 14 -- Scraps and Prayers
     5:30-7:30 / $15.00 -- book box with cards project. 

THERE WILL BE NO SATURDAY STAMPERS CLASS IN AUGUST.  CHECK BACK FOR SEPTEMBER DATES AND CLASSES. 
 
- Thanks for stopping by my corner of the blogging world.
- Come back often for more creative inspiration. 

Wednesday, July 12, 2017

Flower Shop Card with Stitched Oval Background

Here's another card we'll be making at my Saturday Stampers class this Saturday.  What do you get when you mix together a gorgeous embossing folder, a stitched oval shape (with watercolor background over it), a scalloped oval shape, some sparkly 'gems' and 3 pretty flowers?  You get a really pretty card!  Using Berry Burst for the card base is just like adding frosting to the cake.  I love this one!
In my photo, I see that I mixed up the envelope with another card's envelope.  I've since put them with their correct partners.  I love the text on this card!  It's from the Bunch of Blossoms stamp set.  When this poor, lonely stamp set sat in my cabinet for over a year, being neglected, I never paid attention to the sentiments that came with it.  When I took it out - finally - to make a card with it, I realized what I'd been missing out on all this time.  All the sentiments are fabulous.
The embossing folder is called Ruffled and it is amazing.  It's one of our extra thick 3-D embossing folders.  I almost didn't buy it, because I wasn't sure at first if I'd use it.  I'm sure glad I decided to go for it.  I love it!
I added some of our Faceted Gems to the center of each flower, as well as some smaller ones on the ovals.
I don't think you can truly appreciate the depth of the embossing unless you see it in real life.
In the close-up, you can see the soft watercolor background I created on the stitched oval.
Love this one!
July Classes:
July 15 -- Saturday Stampers     1:00-4:00 / $20.00 -- fun techniques to create 6 cards.  I have a few remaining spaces.

BE SURE TO CHECK OUT JULY SPECIALS BY CLICKING ON THE IMAGES ON THE LEFT.  

August Classes:
August 14 -- Scraps and Prayers
     5:30-7:30 / $15.00 -- book box with cards project. 

THERE WILL BE NO SATURDAY STAMPERS CLASS IN AUGUST.  CHECK BACK FOR SEPTEMBER DATES AND CLASSES. 
 
BE SURE TO SIGN UP EARLY BECAUSE CLASS SIZES ARE LIMITED AND ARE FILLING UP FAST!!!

- Thanks for stopping by my corner of the blogging world.
- Come back often for more creative inspiration. 
Tuesday, July 11, 2017

Acrylic Block Technique Meets Colorful Seasons

Before I share another card we'll be making this Saturday, I want to say how much I loved our Scraps and Prayers class.  We met last night and I just love this group of ladies.  We had so much fun creating our notepad project.  They all turned out just great and who could wrap up our evening in a more fun way than Marsha bringing brownies and strawberry ice cream to celebrate my birthday?!!!  It was so much fun.  Thanks, Marsha!

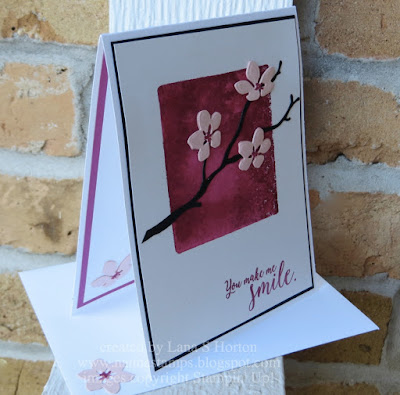
Now, on to today's card I have to share.  I've used the acrylic block technique a lot over the past several years and thought it would look really pretty as a Berry Burst background behind my branch with blossoms.  I love how this one turned out ... and ... yes, we'll be making this one at my Saturday Stampers class ... July 15 / 1:00-4:00.  I still have openings, if you'd like to join us.  Most who have signed up want kits, so there's still space at my table:)
Instead of using markers to color my acrylic block, I tapped it directly onto my Berry Burst ink pad, so I would get a really intense color for my background.  Then, I spritzed my block and stamped on the background for my card.
I cut an extra flower to use on the inside of my card, as well as one for my envelope.
I especially love how the background stamped lighter in the middle.  This was achieved by not pressing down on the middle of my block as much.  Still ..... each one is a total surprise.  They never quite come out the same.
I know it doesn't show up photo, but I spritzed my flowers with a shimmer mist before I attached them to my card, to add some gorgeous sparkle.  You could also use Wink of Stella.  After the spritz dried, I added a few little touches to the center of the flowers with my Berry Burst marker.
I added a layer of black under the top layer of my card, to make the images pop and to tie it in to my branch.  On the inside, I added a layer of Berry Burst behind the Whisper White layer.  There's color everywhere:)
July Classes:
July 15 -- Saturday Stampers     1:00-4:00 / $20.00 -- fun techniques to create 6 cards.  SPACES STILL AVAILABLE.

BE SURE TO CHECK OUT JULY SPECIALS BY CLICKING ON THE IMAGES ON THE LEFT.  

August Classes:
August 14 -- Scraps and Prayers
     5:30-7:30 / $15.00 -- book box with cards project. 

THERE WILL BE NO SATURDAY STAMPERS CLASS IN AUGUST.  CHECK BACK FOR SEPTEMBER DATES AND CLASSES. 
 
BE SURE TO SIGN UP EARLY BECAUSE CLASS SIZES ARE LIMITED AND ARE FILLING UP FAST!!!

- Thanks for stopping by my corner of the blogging world.
- Come back often for more creative inspiration. 

Monday, July 10, 2017

Beautiful You Front Step Card

In today's post, I'm sharing one of the cards we'll be making at my Saturday Stampers class this week (July 15).  This card is called a Front Step card and, amazingly enough, it folds flat to fit a regular envelope.  I chose the gorgeous color story of Dapper Denim and Lemon Lime Twist ... again.  I love them together!
I watercolored the beautiful lady, using inks and my Aqua Painter.  I added a second oval behind her and watercolored it, to add extra color and dimension.  This layer is optional.
It is surprisingly easy to make this kind of card.  I'll share more after my class this week.
In the image above, you can see how I've folded it flat.  This really does fit into a regular envelope.
In the side view below, you can see how it's constructed.
This card was inspired by a wonderful lady on a blog I discovered recently ... Jan B, at JanB cards.
http://www.janbcards.com/
July Classes:
July 15 -- Saturday Stampers     1:00-4:00 / $20.00 -- fun techniques to create 6 cards.

BE SURE TO CHECK OUT JULY SPECIALS BY CLICKING ON THE IMAGES ON THE LEFT.  

August Classes:
August 14 -- Scraps and Prayers
     5:30-7:30 / $15.00 -- book box with cards project. 

THERE WILL BE NO SATURDAY STAMPERS CLASS IN AUGUST.  CHECK BACK FOR SEPTEMBER DATES AND CLASSES. 
 
BE SURE TO SIGN UP EARLY BECAUSE CLASS SIZES ARE LIMITED AND ARE FILLING UP FAST!!!

- Thanks for stopping by my corner of the blogging world.
- Come back often for more creative inspiration. 

Sunday, July 9, 2017

More Squash Cards

Here are a couple more simple squash cards that I made.  They have the same design as the ones we made at our June Scraps and Prayers class.  These cards show how you can decorate each section with DSP.  Once you've added the papers, you can then add any messages, images, and/or text that you would like.


July Classes:
July 10 -- Scraps and Prayers / REGISTRATION CLOSED
     5:30-7:30 / $15.00 -- fun notepad project. 
July 15 -- Saturday Stampers
     1:00-4:00 / $20.00 -- fun techniques to create 6 cards.

BE SURE TO CHECK OUT JULY SPECIALS BY CLICKING ON THE IMAGES ON THE LEFT.  

August Classes:
August 14 -- Scraps and Prayers
     5:30-7:30 / $15.00 -- book box with cards project. 

THERE WILL BE NO SATURDAY STAMPERS CLASS IN AUGUST.  CHECK BACK FOR SEPTEMBER DATES AND CLASSES. 
 
BE SURE TO SIGN UP EARLY BECAUSE CLASS SIZES ARE LIMITED AND ARE FILLING UP FAST!!!

- Thanks for stopping by my corner of the blogging world.
- Come back often for more creative inspiration. 

Saturday, July 8, 2017

Our Last Project from June Scraps and Prayers ... a Squash Card

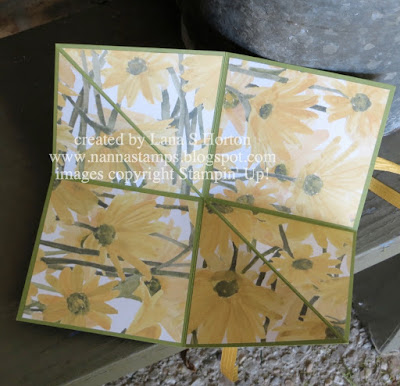
I love making squash cards and hadn't made any for a long time, so I thought this would be a fun card to use in our class.  It's a squash card, which is kind of like a teeny tiny squash book.  We made the card on the right at my class.  The one on the left is basically the same.  I just showed how you could use a belly band to keep it closed, instead of tying it closed with a ribbon.
I decided to use Wisteria Wonder as my card base.  It is in this DSP, even though it's not listed.
This particular design of the Delightful Daisy DSP is so soft and pretty.  It has a beautiful watercolor look to it.
This card starts as an 8 1/2" square.  Fold in half in both directions and then diagonally once.
How you decorate a squash card is totally up to you and your imagination.
Which style do you like the best?  In my next post, I'll share some other squash card designs.  Be sure to come back to see them.
July Classes:
July 10 -- Scraps and Prayers / REGISTRATION CLOSED
     5:30-7:30 / $15.00 -- fun notepad project. 
July 15 -- Saturday Stampers
     1:00-4:00 / $20.00 -- fun techniques to create 6 cards.

BE SURE TO CHECK OUT JULY SPECIALS BY CLICKING ON THE IMAGES ON THE LEFT.  

August Classes:
August 14 -- Scraps and Prayers
     5:30-7:30 / $15.00 -- book box with cards project. 

THERE WILL BE NO SATURDAY STAMPERS CLASS IN AUGUST.  CHECK BACK FOR SEPTEMBER DATES AND CLASSES. 
 
BE SURE TO SIGN UP EARLY BECAUSE CLASS SIZES ARE LIMITED AND ARE FILLING UP FAST!!!

- Thanks for stopping by my corner of the blogging world.
- Come back often for more creative inspiration. 
Related Posts Plugin for WordPress, Blogger...