Pages

Tuesday, June 30, 2015

A Wonderful Round Frame With an Awesomely Artistic Project

I'm not trying to brag about my work when I say this is an Awesomely Artistic project.  That's the name of our new stamp set.  This is such a versatile set and lends itself to working in 3-D, whether it be on a card or a project such as my round frame.  I found this little round frame when I was in Springfield and fell in love with it.  When I was there after my recent doctor's appointment, I almost bought a second one because I liked it so much.  We'll see.
It almost looks like I got glue on the edge of the frame, in the photo below, but it's just a reflection.  I love dragonflies and even managed to cut out 2 of them.  The top layer only needs the wings.
If you haven't tried a project like this one, you should go hunt down a frame you really like and give it a try.  Remember to place the glass behind your art work, so the dimensions of the project show well... and don't get smashed.  Keeping the glass there also gives it stability and you know you always have it, if you decide to change out the project and use it for a photo frame.
- Thanks for stopping by my little corner of the blogging world. 
- Click on the tab at the top of the page to see my class schedules and registration policies or click on the left for sneak peeks. 
- Come back soon and come back often for more creative inspiration.

Monday, June 29, 2015

Butterflies in Blues

How about some beautiful blues ... with butterflies ... for today's post?  I have 3 shades of blue in my color story ... Pool Party ... Bermuda Bay ... and Island Indigo.  The narrow strip is a leftover piece from some previous watercolor projects, to give some texture, along with shades of blue-green.  I also added 2 of our new metal rimmed pearls.  I love these.  They come in 3 sizes and are adhesive backed, for easy use on your projects. 
I used one of our brand new embossing folders, Fluttering, for the top layer of my card.  This is a beautiful embossing folder that is a new 6 X 6" size!  I know I'll be using this one a lot.  Because of the embossed layer, I decided that I'd use some scraps of an old silver stretch cord (retired SU) for the antennae on my butterfly, instead of stamping them.  You could easily stamp them instead.  I just wanted a bit more texture.
I'm pretty happy with my card and think the blues make me happy rather than feeling blue, on this one.
So that's my card for today.  Now, it's off to putting my studio back into order (after my party yesterday) and getting on to some new projects.  I have a new frame just begging for some Calla Lilies.  

I think I met my goal yesterday ... big time ... of wanting to have the best party yet.  It pays off to work 6 weeks straight, all day long (and portions of the nights) to pull this off.  The best part ever was seeing 2 returning customers that I hadn't seen for a long, long time.  They are super nice ladies and I'd really missed them.  Sometimes, life gets in the way for us and I'm so glad that they're at a place to be able to come back and get into some stamping again.  We all had a super time.
 
- Thanks for stopping by my little corner of the blogging world. 
- Click on the tab at the top of the page to see my class schedules and registration policies or click on the left for sneak peeks. 
- Come back soon and come back often for more creative inspiration.

Saturday, June 27, 2015

Watermelon Crumb Cake

No, I've not invented a new food but I do have a great new color combo... Watermelon Wonder and Crumb Cake.  I also have another beautiful new stamp set to share with you.  This one is called You've Got This.  It has a large, gorgeous flower, a couple of text stamps and a wonderful, large background stamp.  And, to bump it up a notch... I have 2 versions of this card!

Here is Version One:


Here is Version Two:


In both cards, I've used the same design, along with some little speckles stamped for added texture.  They are from our Awesomely Artistic stamp set.  So, which version do you like the best?  I hope you'll give this color combo a try with some of your next projects.  As I've explored using the new In Colors, I've enjoyed seeing how they look with our other  colors.  A color can change a lot, depending on how you use it.

- Thanks for stopping by my little corner of the blogging world. 
- Click on the tab at the top of the page to see my class schedules and registration policies or click on the left for sneak peeks. 
- Come back soon and come back often for more creative inspiration.

Friday, June 26, 2015

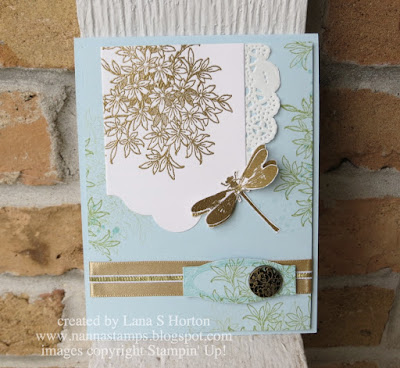
Awesomely Artistic in Soft Sky

I wanted to create a card with a gorgeous new stamp set and I wanted to created something soft and beautiful, with a vintage look.  So, I reached for Awesomely Artistic and some Soft Sky CS, along with my gold EP and some Antique Brads.  I love the result. 
I stamped and stamped off (for a lighter shade) with Pear Pizzazz and Soft Sky inks, embossed the focal piece with gold and added extra wings to the embossed dragonfly.  He is embossed and then the wings are curled up, for added dimension.
For the little piece over the ribbons, I stamped the leafy image and then added an Antique Brad.  I doubled the ribbons, with a thin one over the wider ribbon and wrapped them around the top layer of the card.  This layer is up on dimensionals. 
I added just a little piece of paper lace doily peeking out from the die cut piece.  I like the look.  These are brand new framelits and I will be using them a lot.  There are 7 (layering) dies in the set!
I pronounce this card a success and am ready to make some more creations!

- Thanks for stopping by my little corner of the blogging world. 
- Click on the tab at the top of the page to see my class schedules and registration policies or click on the left for sneak peeks. 
- Come back soon and come back often for more creative inspiration.

Thursday, June 25, 2015

Bohemian Remarkable You

Today's card uses my same design as the card in my previous post, with new stamps.  It changes the look a bit and I absolutely love this one, too.  I had more background space on my layered circles on this card, so I got to add a bit more watercoloring this time.  It makes for a pretty background that is quick and easy to do.  
My coloring on the flower and leaves was done with inks and an Aqua Painter.  The card inside and the envelope are stamped to coordinate with the card.  The colors are Bermuda Bay and Island Indigo.  I never really used these colors together too much until I got this new paper and, I must say, they are gorgeous together.  I am passionate about playing with colors.  When beginning a new card or project, I always start with color first and go from there to creating my design.  That's what really works for me.
Isn't this a gorgeous stamp set?  This flower image reminds me of beautiful times spent at a lakeside cabin in Minnesota.  The water lily is their state flower.  Our first vacation as a married couple was to a resort on Clamshell Lake (on the White Fish chain).  My husband knew the resort owners and we became like family.  Going back for a week each year was like a family reunion.  We became close friends with several other couples and we all planned to go the same week each year.  It was a wonderful family resort with lots to do for every age.  My husband would play his guitar and we'd sing around a campfire on the beach at night.  Those were the days.  Our first year there, my son was just 4 months old and our daughter was 3 years old.  They loved it as much as we did, but the car ride to get there... not so much:)
I'm off to work in my studio some more this morning.  I'm working on vintage cards for my July Saturday Stampers class.  This afternoon, a good friend is joining me for more stamping and then we'll join our spouses for dinner tonight.  Talk about a fun day!  Yes!
- Thanks for stopping by my little corner of the blogging world. 
- Click on the tab at the top of the page to see my class schedules and registration policies or click on the left for sneak peeks. 
- Come back soon and come back often for more creative inspiration.

Wednesday, June 24, 2015

Bohemian Blues

I have the blues today and it's a very good thing.  I'm talking Bohemian blues... as in a gorgeous card with a stamp so gorgeous that words fail me to describe it.  It's a gorgeous hydrangea... one of nature's most beautiful flowers.
See what I mean... gorgeous.  This card is one of the most favorites I've ever made... at least for now:)  I must warn you that making this card is not for the faint of heart because it involves layers and layers of cut pieces... a lot of fussy cutting.  I find fussy cutting very relaxing, second only to watercoloring (which I could do all day long).  The flower and the text are embossed in black EP.
I stamped the flower on the inside and on the envelope, as well.  The DSP has Bermuda Bay and Island Indigo in it and I love it.  I used a variety of blues and even a dash of purple to color the flower.  I just made puddles in the lids of my ink pads and painted with it using an Aqua Painter.  I added a light wash of blue watercoloring around the outer edges of the image.  I worked with Shimmery White CS, as it can take the watercolor.  The highlights on the ends of the stamens were done with my white gel pen.
I'm off to continue my marathon of creativeness.  My studio is my happy place and all 3 furry babies are here enjoying it with me.  Last night, I finished 2 more framed projects.  My morning started off with a creative breakdown yesterday, as I got stuck on a design and just kept trying it again and again to get it the way I wanted.  When I finally stopped and put all the pieces (a lot!) into a cello bag and walked away from it, my brain immediately turned on to other creative ideas and I was able to get back to creative fun.  Moral of the story:  If your project is not going well, just walk away!  You can always try it another day.  The next time I get 'stuck' on a design, I will reread this post, walk away and go on to something else.  There's always another project:)  

- Thanks for stopping by my little corner of the blogging world. 
- Click on the tab at the top of the page to see my class schedules and registration policies or click on the left for sneak peeks. 
- Come back soon and come back often for more creative inspiration.

Tuesday, June 23, 2015

A Trio of Berry Baskets, A Video, A Promise, A Tip ...and An Update on My Creative Binge

I must confess that, when the Spring Occasions Catalog came out, I was super excited to get the Berry Basket Bigz Die.  And then... it sat and waited for me to get around to playing with it.  Well, last week, I finally had time to do just that.  I love it!!!  Thanks goodness it didn't retire before I could create with it.  So, today, I have a trio of berry baskets to share with you.
Aren't they cute?  I used some of our new Cotton Papers (Watermelon Wonder) for the 'filler' in my baskets.  I have an old shredder that only cuts one way.  I got it and reserved it for just this purpose... tearing up perfectly good papers... to make filler:)
I made bunches of butterflies... gold foil and Delightful Dijon... and used them to decorate (and for a non-fattening treat in the baskets:)  Do you see some new ribbon on the two end baskets?  It is like our retired In Colors ribbon... soft, smooth, shiny and luscious... not to mention how easy it is to work with it.
If you plan to make some berry baskets of your own, be sure to watch this video.  It will make your work absolutely easy as pie! 
Click here for the video.

My promise:
When a new product arrives in the little brown truck, I will not put it away until I've played with it a bit and put it to good creative use.  I've already made sure that all my new stamps got put together and totally ready to use as soon as I unpacked them.

Tip:
How do I store my stamps?  I organize them according to the categories in the table of contents in each new catalog when it comes out each year.  I number the categories and then write that number on the back of the stamp case.  If it does not retire but moves to a new category when a new catalog comes out, I simply remove the number (alcohol wipe) and label it with its new number.  It makes it super easy to put them all away and to find them when I need them.  Each box has a labeled tag on it with the category title and the number.
When the box is full, no more stamps for that category.  I've always made it fit.  I do have 2 boxes for Artistic Expression.  It's easy to tell what style of stamps I love the most.  The tiny Christmas stash will grow soon... no problem:)

Are you ready for my creative binge update?
- 12 albums completed and printed from MDS, right before it retired
-  4 framed projects
- 70 brand new cards... yes, 70!

Now, I must sign off and go make something beautiful today.

- Thanks for stopping by my little corner of the blogging world. 
- Click on the tab at the top of the page to see my class schedules and registration policies or click on the left for sneak peeks. 
- Come back soon and come back often for more creative inspiration.

Monday, June 22, 2015

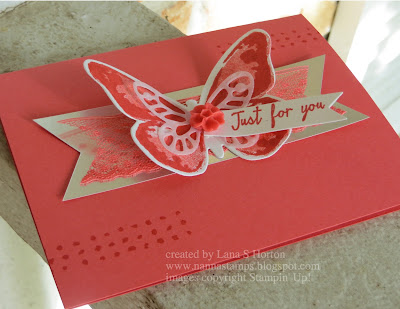
Watercolor Wings with New In Colors... 2 Ways

Sometimes, it's fun to try to 'CASE' a card you see that you like.  This one was inspired by someone's photo of a display board from Stampin' Up's Australian Convention.  I don't want to ever copy exactly and don't think I could.  Once my creative juices get flowing, things start to change pretty fast.  I'll share my cards and then explain a bit about them. 
The photo I saw had In Colors DSP for the banner strip.  I didn't have mine (yet) so I decided to go with silver foil paper on 1 of each color and our new Corrugated Paper on 1 of each color.  I love this new paper.  It comes in white and Kraft.
Here are the 2 variations.  I wasn't sure if, on the card in the photo, they used vellum for the tiny butterfly, but decided that's what I'd like on mine.  After stamping and cutting out the large butterflies, I spritzed them with some of my shimmer concoction.  They have a nice shimmer coming through behind the vellum.  You have to see it in real life.
I also added a tiny bit of stamping on the card base, using 2 of the little stamps that came with the Watercolor Wings stamp set.
I love our new little Blossom Accents.  I used the Bitty Banners framelits for the 'Just for You' strip and then cut one end off straight, then attached it under the blossom.
I added a strip of our new Dotted Lace trim over each of the banners, to show off how pretty it is.  These cards were quite time consuming, but I love the results.  I used a lot of product, so I hope I didn't forget anything.
I must confess that, with all my intense work time I've had in my studio lately, that I'm having trouble choosing a favorite stamp set and a favorite new In Color.   The party is this Sunday, so I have to decide this week.  I thought I knew right away but, after working with so many lately, I just love them all.  Ok, I'll think hard and choose... by Sunday afternoon.  Yikes!

- Thanks for stopping by my little corner of the blogging world. 
- Click on the tab at the top of the page to see my class schedules and registration policies or click on the left for sneak peeks. 
- Come back soon and come back often for more creative inspiration.

Saturday, June 20, 2015

Another Pretty In Colors Card

I have another fancy card to share with you today, featuring all 5 of our new In Colors.  This one uses a wonderful new stamp set called You've Got This.  This set and the one I used in my previous card (The Best is Yet to Come) both feature large image flowers.  I love sets like this because they're versatile for cards, projects and scrapbooking.
For my envelope, I used some of our new Envelope Papers to line it and then fancied it up even more with a little gold doily on the flap.  Aren't our new Metallic Gold Doilies pretty?  They come in 2 sizes, as shown on my card.
Once again, I find that a photo can't pick up the elegance of the Shimmer Mist that I spritzed onto my flower blossom, but it's there and, in real life, it's stunning.  I colored the flower with ink and an Aqua Painter, my favorite way to color.
My allergies are really bad today, so I think I'll stay inside and keep up my creative work in my studio.  I also have to make some posters for Bible School.  I'll send Bill to watch the parade today and then tonight, we'll have fireworks to end our Forsyth Family Festival.  I'll have to sedate Toby Joe, as he absolutely has a melt down with fireworks or loud thunder.  It will be their first fireworks for the puppies, so I don't know how they'll do.  Fortunately, we can see the fireworks from our front porch, so I can keep a close eye on them.

- Thanks for stopping by my little corner of the blogging world. 
- Click on the tab at the top of the page to see my class schedules and registration policies or click on the left for sneak peeks. 
- Come back soon and come back often for more creative inspiration.

Friday, June 19, 2015

Cherry on Top Cute Little 3 X 3" Cards

I love our new Cherry on Top DSP.  I decided to make some cute little cards with it... 10 in all.  By getting a package of Cherry on Top CS, I worked with these 3 wonderful colors:  Watermelon Wonder, Cucumber Crush, and Bermuda Bay. 
I used a couple of greetings from my new Tin of Cards stamp set and lined each envelope to coordinate with the cards.
What a fun project!
I love the cute little Blossom Accents for each of our new In Colors!  They attach easily with Liquid Tombow adhesive.
The cards are now all up on display in my studio.  When the previous catalog retired, I took down each and every sample I had on display.  I'm creating all new displays and it's fun to see the displays grow and start to look fresh and new.  The very last card on the lower right has banners instead of greetings.  I went to stamp the greeting and the puppies bumped me and I dropped the stamp.  Ugh!  I couldn't bear to throw the card away, so I covered the smudge with banners.
By the way, I made nearly 50 different kinds of butterflies yesterday, as I continued to work on various projects.  Come back soon as I continue to share more projects.  I'm having a ball!

- Thanks for stopping by my little corner of the blogging world. 
- Click on the tab at the top of the page to see my class schedules and registration policies or click on the left for sneak peeks. 
- Come back soon and come back often for more creative inspiration.
Related Posts Plugin for WordPress, Blogger...