Pages

Monday, October 31, 2016

You're In My Thoughts Card

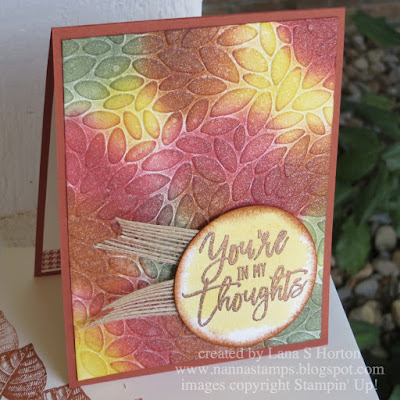
Here's a card for you today that uses a favorite technique of mine ... embossing, sponging and then spritzing over the embossed layer for your card.  I've used this technique many times because it always turns out to be just beautiful. 
I watercolored a bit of background on the circle piece and then embossed the sentiment with our new Copper EP.  I also sponged around the edges to give it more dimension.  
The circle piece is attached with dimensionals, with a couple pieces of ribbon beneath it.  This card could be used for many occasions.  It's good to keep a bunch of cards in your stash that can be adapted to multiple occasions, so you'll always be prepared.
I always love the look of all these Fall colors together.
- Thanks for stopping by my corner of the blogging world. 
- Click on the tab at the top to see my class schedules. 
- Look on the left for sneak peeks and registration policies. 
- Please sign up to follow my blog and/or leave a comment. 
- Come  back often for more creative inspiration. 
Friday, October 28, 2016

An Elegant Fall Tree

I'm enjoying our beautiful Fall weather.  Although I haven't been able to take a walk, due to my leg injury, I still notice and enjoy the trees as we drive by them.  Many have already lost all their leaves and some are still working on it.  Trees, even bare ones, have an artistic beauty to them that has always fascinated me.  Here's another tree card (with plenty of leaves) that I enjoyed using my new MISTI to create.  
Our Lovely As A Tree is our oldest (an perhaps best loved) stamp set!
I added a couple of Vintage Leaves over some gently coiled thread for a nice element to embellish the lower part of the oval frames.
I love how this turned out.  This would be a nice masculine card, but I think anyone would enjoy receiving it in the mail.
- Thanks for stopping by my corner of the blogging world. 
- Click on the tab at the top to see my class schedules. 
- Look on the left for sneak peeks and registration policies. 
- Please sign up to follow my blog and/or leave a comment. 
- Come  back often for more creative inspiration. 

Thursday, October 27, 2016

A Beautiful Fall Tree and A Mini Tutorial

I'm enjoying our beautiful Fall weather.  Although I haven't been able to take a walk, due to my leg injury, I still notice and enjoy the trees as we drive by them.  My tree today still has lots of wonderful foliage in beautiful Fall colors.  
This is one of the cards we made at one of my previous Saturday Stampers class.  It is stamped onto a circle of watercolor paper.  The circle behind it is cut from some of our wonderful Copper Foil.   The circle pieces are attached to one of our Specialty Papers which is sponged to a gorgeous Fall color.  After I tied the burlap ribbon around the card, I attached a tiny leaf with a teeny, tiny rhinestone.  I love it!
A mini tutorial for creating this beautiful tree:
- Stamp the bare tree onto watercolor paper.
- Stamp 2 or 3 Fall colors of 'leaves' (1 at a time) onto the watercolor paper.
- Gently spritz the 'leaves' with water, using just enough to gently blend the colors.
- Using an Aqua Painter, paint some green under the tree, for 'grass'.
- Once it's all completely dry, spritz (just the white circle) with shimmer mist.
- Assemble your beautiful card and enjoy.
- Thanks for stopping by my corner of the blogging world. 
- Click on the tab at the top to see my class schedules. 
- Look on the left for sneak peeks and registration policies. 
- Please sign up to follow my blog and/or leave a comment. 
- Come  back often for more creative inspiration. 

Wednesday, October 26, 2016

A Fall Display/Quick Tip for Creating Displays

I thought you might enjoy one of my Fall displays, showing how my Fall banner (from a previous post) fits in with it all.  
A quick tip for easy displays:
I found the frame at our local craft store.  I came up with a new and easy way to add the cards for display.  I placed a magnet behind each section of the 'window' frame.  When I want to display a card, I hold it in place with a second magnet inside the card.  It's worked out to be a great way to quickly display cards and easily change them out when I want to update my display.

- Thanks for stopping by my corner of the blogging world. 
- Click on the tab at the top to see my class schedules. 
- Look on the left for sneak peeks and registration policies. 
- Please sign up to follow my blog and/or leave a comment. 
- Come  back often for more creative inspiration. 

Tuesday, October 25, 2016

Embossed Copper Letters/ With Tutorial

As promised, I'm sharing my tutorial today for embossing letters with Copper EP.  It's fun and it's easy and I hope you'll try it.
 
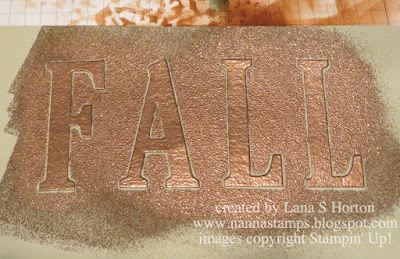
Usually, when I emboss something small, I lay the piece in a small (for embossing only) cake pan.  This time, I wanted to try to emboss all the letters with a quicker and easier plan.  What I came up with was to add a tiny bit of adhesive to the back of each letter and attach them to a scrap of CS.
Then, I patted down each letter with my VersaMark ink pad.
I then sprinkled my Copper EP over all the letters.  A small amount will fall around the letters and stick there.  I just left it and didn't worry about it.
I heat embossed all the letters and then gently pulled them off the scrap CS.  They came off quite easily.
Aren't they beautiful?  Here's my Fall banner again.
- Thanks for stopping by my corner of the blogging world. 
- Click on the tab at the top to see my class schedules. 
- Look on the left for sneak peeks and registration policies. 
- Please sign up to follow my blog and/or leave a comment. 
- Come  back often for more creative inspiration. 

Monday, October 24, 2016

Fall Banner with Embossed Copper Letters

I am excited to share my latest banner with you today.  It's for Fall and it has embossed letters.  In my next post, I'll share a tutorial on how I made them. 
The pictures kind of speak for themselves.  
I added embossed leaves between each of the banner pieces.
This was really fun to create and I love how it turned out.
In my next post, I'll share a tutorial for how to create the embossed letters.

- Thanks for stopping by my corner of the blogging world. 
- Click on the tab at the top to see my class schedules. 
- Look on the left for sneak peeks and registration policies. 
- Please sign up to follow my blog and/or leave a comment. 
- Come  back often for more creative inspiration. 

Sunday, October 23, 2016

OBX 2016 ... An 'Interesting Vacation' ... Part 7, Wrapping It All Up

I'll be wrapping up my tales from the beach today, with this last post.  Yes, the storm was terrifying and yes, we had some interesting experiences.  Would I do it again?  I hope so.  I do love the beach and, hopefully, we won't be in the aftermath of a hurricane again for a long while.  Better yet ... never!
Our beach house had a brand new deck and new steps leading up to it.  The deck chairs were surprisingly very comfortable.
We still got in some relaxing times and got to enjoy the beauty of the ocean and the beach.  I do love it so.  Probably our most amusing excitement was when we came home one day, opened our door and almost let a cute little lizard into our beach house.  He was hanging on our door!  I don't think he was the 'actor' from the insurance commercials:)

I should also mention that our travel time was totally uneventful, thank goodness.  We saw several bad accidents, mostly on the opposite side of the highway.  Our 1-year old Highlander was very comfortable and did a super job of helping us enjoy the trip.  We forgot to look into some audio books, so we spent time telling each other about books we'd read recently.  This was actually quite fun, as we both love to read and always have stories to share.
So... that's my tale of the beach and our 'interesting vacation.'  I hope you enjoyed it all.   I'm resting, with my feet up today because I'm still babying along my 'vacation wound' and then, on Friday, I ran into the bottom, corner edge of one of my leather chairs (with my other leg) and now my left ankle is black ... very black ... and red around the edges.  I'm trying to work a bit and then get back to feet up time.  It's slowing down my work but I get to read while I rest, so not entirely bad.  I can do some designing then, too.  I'm going to try really hard to quit being such a klutz!!!

Come on back as I get back to some fun paper crafting.  What will I be working on next?  I will be getting ready for my Open House/Christmas Party, two more Scraps and Prayers classes for 2016, planning my projects (and gifts) for my November Christmas Retreat ... and... planning for 2017.  It's all fun and exciting!!!  Come on back so you don't miss a thing!

Saturday, October 22, 2016

OBX 2016 ... An 'Interesting Vacation' ... Part 6, Nature Walks by the Sound

After the worst days of the storm aftermath were over, we did enjoy some nature walks by the Sound.  It was beautiful.  


This is the Sound side of the Currituck Lighthouse.   I just love it.  Over the years, I've accumulated a lot of shots of the lighthouse, but they were mostly taken from the beach side, as we walked the beach.

Come back for more stories from the beach, as I'll be wrapping it all up in one last post.  Then, it's back to creative endeavors.   

- Thanks for stopping by my corner of the blogging world. 
- Click on the tab at the top to see my class schedules. 
- Look on the left for sneak peeks and registration policies. 
- Please sign up to follow my blog and/or leave a comment. 
- Come  back often for more creative inspiration. 

Friday, October 21, 2016

OBX 2016 ... An 'Interesting Vacation' ... Part 5, Some Fun Beach Shots

Here are a few more fun beach shots for you to enjoy.


This is a pretty lame job of writing the date in the sand this year.  It was the best I could do with a wounded leg.  I'll have to learn to write with my left leg:)
This year, I feel like I was really cheated of my favorite activity of walking the beach (barefoot) close to the edge of the water and letting the waves lap over my feet.  If they're not under a hurricane warning, I'll be heading back there soon ... hopefully, next year.
I'll be wrapping up my story soon, so be sure to check back and see what I have to share with you.  Then, it's back to getting my creative juices flowing.

- Thanks for stopping by my corner of the blogging world. 
- Click on the tab at the top to see my class schedules. 
- Look on the left for sneak peeks and registration policies. 
- Please sign up to follow my blog and/or leave a comment. 
- Come  back often for more creative inspiration. 

Thursday, October 20, 2016

OBX 2016 ... An 'Interesting Vacation' ... Part 4, The Wound and a Great Doctor

If you don't like scary pictures, skip this post.  Yes ... this really, really, really hurt.  The story begins the day following the night of terror with the house shaking and the rain pelting down in flooding amounts, while trees hit and ground against the side of the house and the roof.

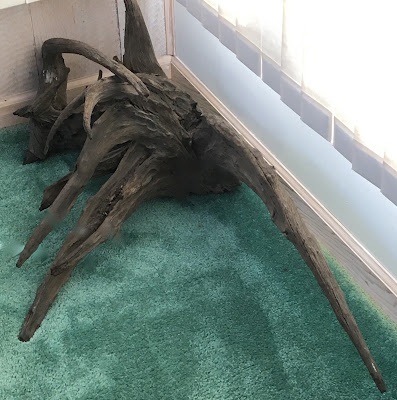
I started over to the dining area of our little beach house to look out the windows to see how much flooding we'd had during the night.  In the corner (I don't know why!) the house had a giant piece of driftwood.  I saw it, but I did NOT see the dagger-like piece that stuck straight out from it and I ran into it full force and just gouged a big hole out of my leg.

Above, this is the piece of driftwood.  The piece that about killed me is sticking out in the lower, right corner of the photo.
Below, the damage.  As you can see, my leg all around the wound was immediately irritated and it got really sore, too.
Below, here I am all bandaged up.  As you can see, my ankle was already swelling.  The ankle bracelets were soon cutting into my leg and I had to take them off.
My doctor (and the nurse) were SO nice.  They put a non-stick bandage over the wound (after cleaning it --- ouch!) and then wrapped it so it would stay nicely protected.  This was the end of walking the beach.  I tried it, but the bandage moved a bit as I walked, and it felt like the wound was on fire ... really painful.  Anyway, the doctor said if I got sand in the wound, they would have to scrub it out, so even though she said I could do it, it just didn't work out this year.

The doctor complimented me on my new top and wanted to know where I'd gotten it.  She said her friend owned the little shop where I bought it.  She then told me other places near the Urgent Care to shop, as well as finding out what kind of food we liked and suggested a place she thought made the best pizza on the whole beach.  I think she was right!  She couldn't understand why 70 mph winds would bother me when we were from Illinois and had tornadoes.  I told her that tornadoes didn't last all night like the storm from the hurricane did!  Also, we have basements here!!!

After trying the doctor's recommended pizza place, we tried to visit a few shops (closer to the Kitty Hawk area) but they had all been flooded.  What a sad mess.  Anyway, if you have to be unfortunate enough to get hurt on vacation, it's nice to know that they have a wonderful Urgent Care place where you can get help ... along with a big drug store close by, to pick up your meds.

Come on back for Part 5 ... and no more scary pictures, I promise.

- Thanks for stopping by my corner of the blogging world. 
- Click on the tab at the top to see my class schedules. 
- Look on the left for sneak peeks and registration policies. 
- Please sign up to follow my blog and/or leave a comment. 
- Come  back often for more creative inspiration. 

Related Posts Plugin for WordPress, Blogger...